How to create a product demo video
- product demos
- screen recording
- launch
Record the application window rather than the whole desktop, let automatic zoom follow the cursor while you work, then retarget the two or three zooms that landed in the wrong place. A demo that holds attention runs under two minutes, opens on the problem rather than the interface, and ends on the result. KlipKap Pro handles the recording, the zooming and the export in one pass on both Windows and macOS.
01Decide what the demo has to prove
A demo is an argument, not a tour. Before recording, write the single sentence you want someone to believe at the end. Everything that does not serve that sentence is what makes demos run long.
Two minutes is a useful ceiling. Under thirty seconds you cannot establish a problem; past two minutes you are competing with a pricing page that answers faster.
- Open on the problem, not on your logo or your dashboard
- Show one workflow end to end rather than five features partially
- End on the finished artefact, because that is the thing people remember
- Write the click path down first so you are not thinking while recording
02Record the window, not the desktop
The source picker lists every connected display with a live thumbnail, and a separate tab crops the capture to a region you draw. For a demo, pick the application window: it keeps your other monitors, your dock and your notification corner out of the frame without any cleanup.
Frame rate, system audio, microphone and webcam are all chosen in that same dialog, with a live camera preview before you commit. The window then hides itself and recording is controlled from the tray, so the app you are demoing is the only thing on screen.
03Give it a background instead of cleaning your desktop
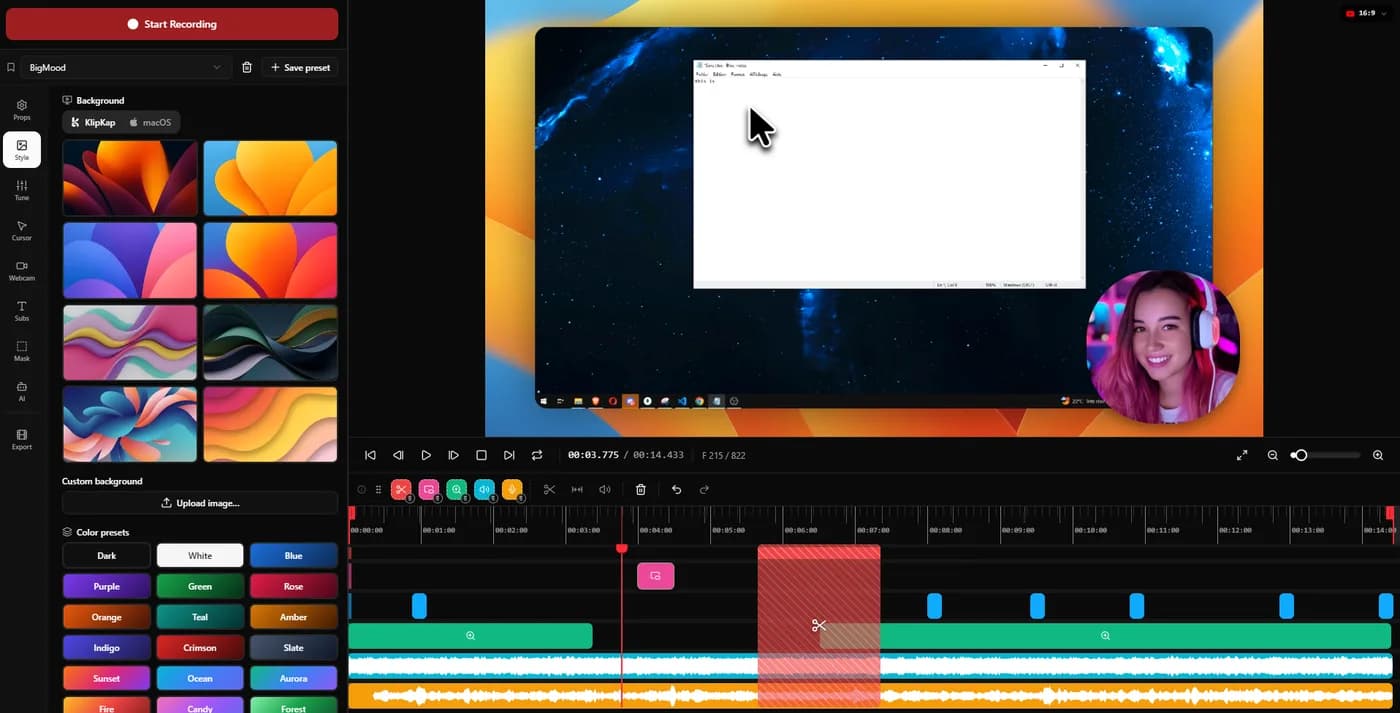
The recorded window sits on a background you choose: a solid colour, one of fifteen gradients, or one of eight supplied images, with adjustable Gaussian blur. Padding around the window goes up to 200 pixels, and the window itself takes a drop shadow and a corner radius up to 40 pixels.
This is the step that separates a demo that looks produced from one that looks like a support recording, and it costs nothing at record time. You are not tidying a desktop or hiding an icon row, because neither is in the frame.
04Let the zoom follow the work, then correct it
Automatic zoom follows the cursor, and three separate controls decide how it behaves: intensity from 1.0x to 4.0x, mouse smoothing from 0 for instant tracking to 1 for maximum lag, and zoom speed from slow to instant. Set them once and they apply to every recording after.
Automatic zoom is right most of the time and wrong at the moments that matter, usually when the important thing is not where your pointer happens to be. Any individual zoom can be switched off cursor-following and pointed at a fixed spot using a crosshair on a preview canvas. Two or three corrections is normal for a two minute demo.
05Make the pointer readable
The cursor is redrawn rather than captured, which is why it can be changed after the recording exists. Twelve pointer styles, adjustable size and shadow, a tilt option that leans the pointer into its direction of travel, and a setting that hides it whenever it stops moving.
That last one matters more than it sounds. A pointer parked in the middle of the frame while you talk is the most common thing that makes an otherwise clean demo look unfinished.
06Add a face only where it helps
A webcam overlay sits in one of eight positions on a 3x3 grid, sized between 5 and 40 percent of frame height, with a border radius that runs from square to a circle. A digital zoom from 1.0x to 3.0x crops into the camera feed itself, which is how you keep a messy room out of shot without moving furniture.
For a launch demo, a face at the start and the end works better than a bubble present for the whole runtime. The middle is where the product should have the frame to itself.
07Fix the audio you already recorded
Microphone and system audio arrive as separate tracks with independent volume, so a loud notification does not force you to re-record the narration. On the Pro tier, six voice processing controls are applied at export rather than baked into the recording: cleanup, adaptive noise suppression, bass boost, voice clarity, voice boost and a de-esser around 7 kHz.
All of it runs on your own processor. There is no upload, no API key and no per-minute credit to watch, which also means the length of the demo has no bearing on the cost.
08Export at the size the channel wants
Six aspect ratios cover YouTube, TikTok and Instagram, X, LinkedIn and Facebook, plus the source dimensions. The Pro tier exports up to 4K at 24, 30, 60 or 120 fps with GPU accelerated rendering; the free tier tops out at 720p with a watermark, which is enough to test the workflow on your own material before paying anything.
GIF output is unusual in this category and worth knowing about: a fifteen second loop in a README or a changelog entry often does more work than a two minute video nobody presses play on.
Quick tips
- 01Record the click path twice and keep the second take. The first one is where you find the step you forgot.
- 02Slow down your mouse. Automatic zoom follows the cursor, so a pointer that darts produces a frame that lurches.
- 03Pause rather than stop when you lose your thread. Paused segments are stitched back together without an edit.
- 04Watch it once at full size with the sound off. Anything unreadable at that size is unreadable on a phone.
- 05Name the file after the claim it makes, not after the date. You will look for it by claim.
Frequently asked questions
- How long should a product demo video be?
- Under two minutes for a launch page or a cold email, and under five for a demo someone requested. The constraint is not attention span but competition: a pricing page or a screenshot answers the same question faster, so a demo has to earn the extra time.
- Do I need a webcam in a product demo?
- Not for the whole runtime. A face at the opening and the close reads as personal without taking frame away from the product. KlipKap Pro places the webcam in one of eight positions and sizes it between 5 and 40 percent of frame height, so it can be small enough to sit at the edge.
- Can I record a product demo on Windows?
- Yes. KlipKap Pro runs on Windows 10 and 11 and on macOS 13 or later, which matters when several people on a team record and the output has to match. Several tools in this category are macOS only.
- What resolution should I export a demo at?
- 1080p is enough for an embed on a landing page and keeps the file small. Export at 4K when the demo shows small text or a dense interface, since the extra pixels are what keep labels readable after a platform re-encodes the video.
More ways people use KlipKap Pro
This guide is written by the team behind KlipKap Pro, a screen recorder and video editor for Windows 10 and 11 and macOS 13 or later. There is a permanent free tier at 720p if you want to try the workflow described here before paying for anything.