KlipKap Pro documentation
Everything KlipKap Pro does, in the order you meet it: record a screen, a window or a drawn region; edit on a timeline with zoom, cut, mask, webcam and subtitle tracks; export MP4 or GIF up to 4K and 120 fps. Recording, editing, transcription and export all run on your own machine. This manual is written against the shipped build, so where the app and an older guide disagree, the app is right and this page follows it.
01Getting started
What you need to run KlipKap Pro, how signing in works, and where you land on first launch.
System requirements
| Minimum | Recommended | |
|---|---|---|
| Windows | Windows 10, x64 or ARM64 | Windows 11, x64 or ARM64 |
| macOS | macOS 13, Intel or Apple Silicon | macOS 14+, Apple Silicon |
| Memory | 4 GB RAM | 8 GB RAM for 4K export |
There is no Linux build. A build is in development, but nothing on this page describes software you can run on Linux today.
Recording, editing, transcription and export all run on your machine. The only network calls KlipKap makes are downloading the app and activating a licence, so an editing session works with the connection off.
Signing in
The sign-in screen appears on first launch and after signing out. Sign-in happens in your browser, not in the app.
- Sign In:
- Opens the authentication page in your default browser.
- Finish the login flow there. KlipKap detects it automatically and returns you to the editor. Nothing to copy back.
First launch
Once signed in you land on the start screen, which does two things.
- Start a new recording:
- The record button, or File → New.
- Open an existing project:
- File → Open Project…, or pick one from File → Open Recent.
02Recording your screen
The source picker, audio setup, the webcam, and the tray controls that run the session.
Choosing what to capture
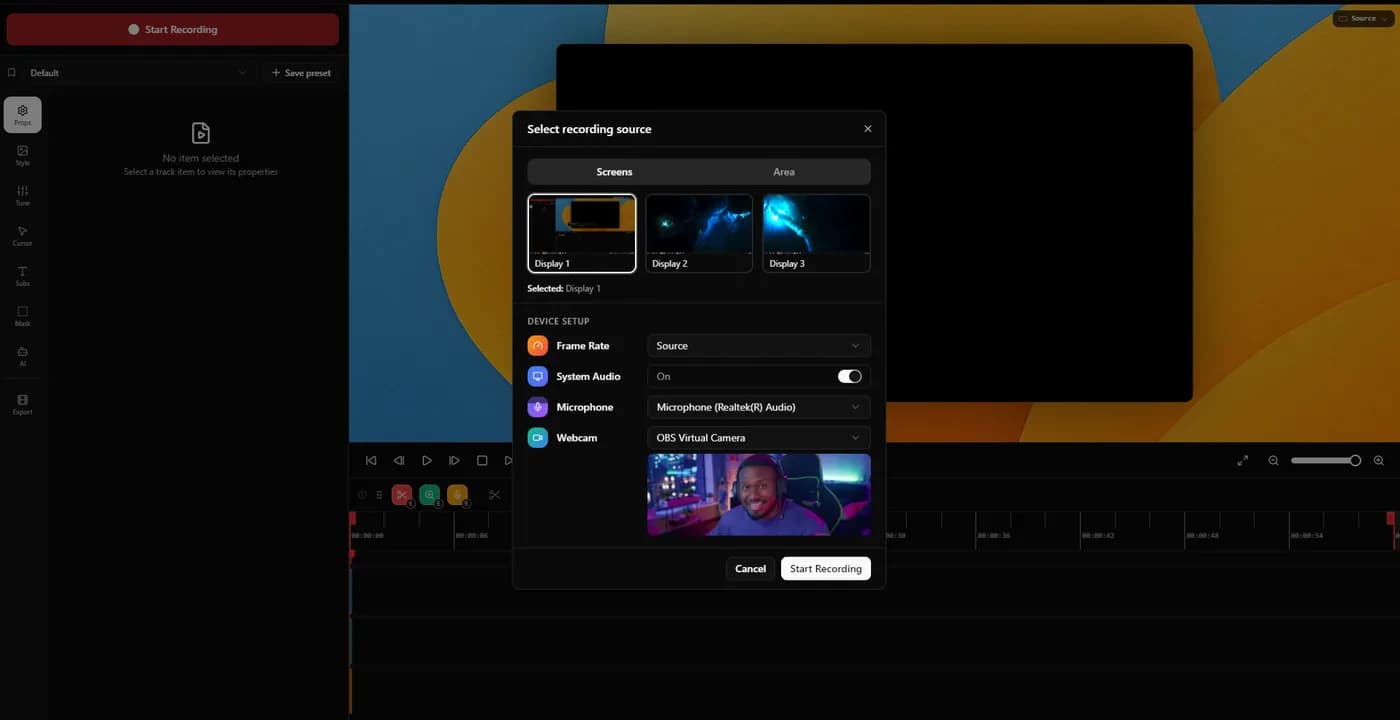
Click Record, or File → New. The source picker opens with three tabs.
| Tab | What it captures |
|---|---|
| Screens | A full display, with a live preview of each one connected. |
| Windows | A single application window. |
| Area | A rectangle you draw on screen, so only that region is recorded. |
Area is worth reaching for more often than it looks. Recording the region you actually need means nothing is scaled down at export, so the result stays sharp, and it keeps everything outside the rectangle out of the file entirely.
Audio
Both audio sources are set in the source picker, before the recording starts. They arrive in the editor as separate tracks with independent volume, so a loud notification does not force you to duck your own voice.
- Microphone:
- Pick your input device from the dropdown. An 18-bar meter shows the live level beside it.
- System audio:
- Captures what your computer is playing (app sounds, music, a video you are reacting to) alongside your voice.
Speak normally and watch the meter before you commit. It should peak in the upper third of the bars and never clip into the red. Almost every unusable take is an audio problem, and this is the ten seconds that prevents it.
Webcam
If a webcam is detected it is captured automatically alongside the screen, as its own overlay track. Position, size, shape and zoom are all decided later in the editor, so nothing about the framing is locked in at record time.
Running the recording
The KlipKap window hides itself when recording starts, so it never appears in your own capture. A tray icon takes over: the menu bar on macOS, the system tray on Windows. It blinks while recording is live.
- Pause:
- Suspends the recording. Resume picks up where you stopped.
- Stop:
- Ends the session and opens the editor with the footage ready.
Use Pause rather than Stop whenever you need a moment to think, find a tab or answer someone. Paused segments are stitched back together automatically, so the viewer sees a continuous take and you never have to cut the gap out by hand.
03The editor
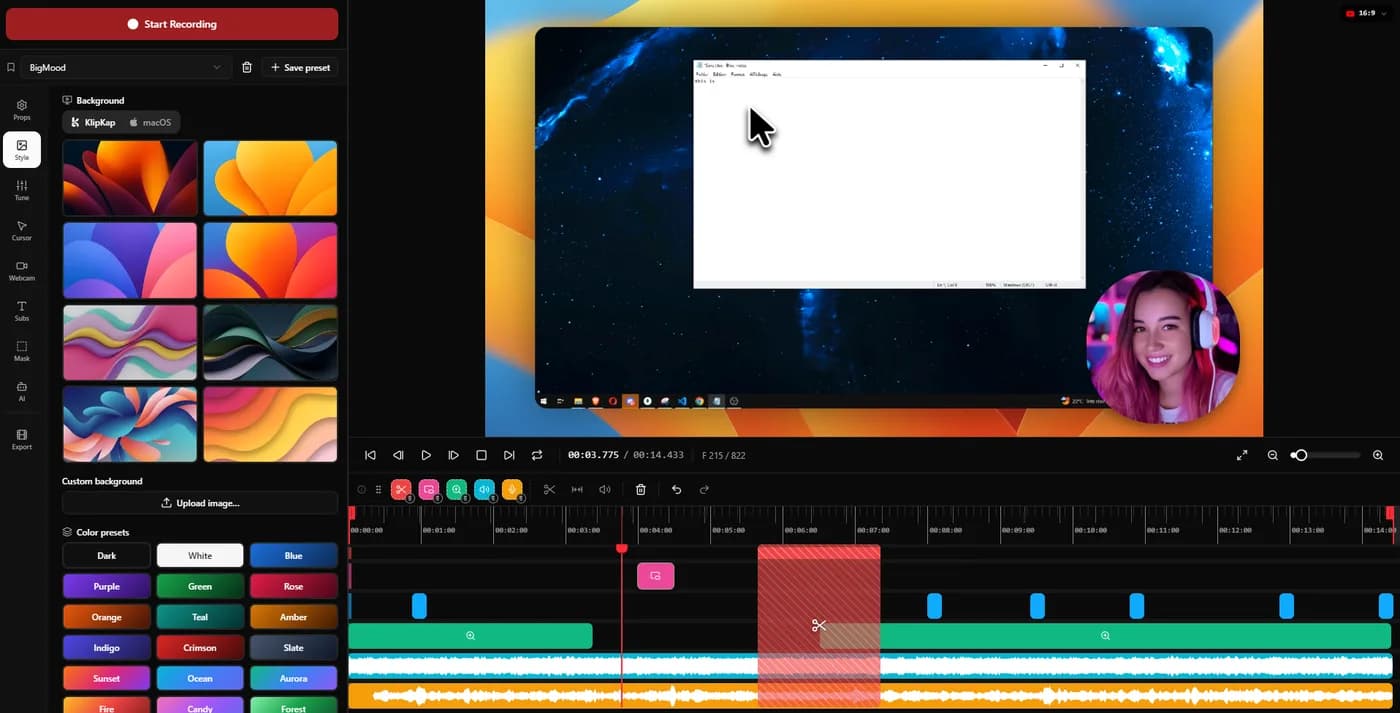
Three panels: the preview in the centre, the properties sidebar on the left, the timeline along the bottom.
Layout
| Panel | Where | What it does |
|---|---|---|
| Video preview | Centre | The current frame exactly as it will export, effects applied. |
| Properties panel | Left | Every control, split across a vertical strip of icon tabs. |
| Timeline | Bottom | All tracks, the playhead, the in/out range and the editing tools. |
The preview is not an approximation. Changes made in the properties panel appear in it immediately, and the export renders the same frame, which is why almost no step in this manual asks you to export to check something.
04The timeline
Nine track types, the in/out range, and the cut and merge tools that decide what survives to the export.
Playback
- Play / Pause:
- The play button, or the spacebar.
- Step / Skip:
- Jump one item forward or back, or straight to the start or end of the timeline.
- Stop:
- Returns the playhead to the beginning, or to the in-point if one is set.
- Loop:
- Repeats playback between the in and out points instead of stopping at the out-point.
- Playhead:
- The vertical red line. Drag it to scrub anywhere in the recording.
The in / out range
Two handles sit on the timeline ruler. Drag them to mark the portion that will be exported. Everything outside is ignored, and playback loops inside it.
Set this before you touch anything else. Every preview you play afterwards loops over the part you are actually shipping, rather than over four minutes of throat-clearing at the front.
Track channels
| Track | Carries |
|---|---|
| Video | The screen recording itself. |
| Audio | Your microphone. |
| System Audio | Sound captured from the computer. |
| Zoom | Camera zoom and pan events. |
| Cut | Stretches removed from the final video. |
| Mask | Blur rectangles that censor part of the frame. |
| Webcam | The webcam overlay footage. |
| Webcam Move | Keyframed webcam position changes. |
| Transcription | Subtitle phrases, once the audio is transcribed. |
Editing items
- Add:
- Click empty space in a track at the position you want, or use the + at the start of the track.
- Move:
- Drag an item horizontally to a new time.
- Resize:
- Drag either edge to shorten or extend it.
- Select:
- Click it. Its controls load in the Props tab, and inline action buttons appear on the item.
- Cut:
- The scissors splits the selected item at the playhead into two segments.
- Merge:
- Joins a segment back onto the next one.
- Delete:
- The ✕ on a selected item removes it.
Cuts
Items on the Cut track mark stretches that disappear at export. Video, audio, subtitles and effects all skip over them together, so a cut never leaves the captions a second out of step with the voice.
Add them by hand, or generate them from the AI tab (see AI auto-cut below).
05The properties panel
Every control in the app, tab by tab: Props, Style, Tune, Cursor, Webcam, Subs, Mask, AI and Export.
Props
Contextual. Select something on the timeline and its own controls appear here.
- Audio item:
- Mute, volume from −60 dB to +60 dB, auto-trim silence, AI Denoise (Pro), and the voice-processing sliders described under Pro features.
- System Audio item:
- The same controls, with mute and volume independent of the microphone track.
- Zoom item:
- Zoom factor from 1.0× to 3.0×. Turn on Manual zoom position to lock the camera on a fixed area with the mini-canvas crosshair instead of following the cursor.
- Mask item:
- The position and size of each rectangle in a censor mask, if you would rather type them than drag them.
- Subtitle item:
- Edit the phrase text directly. Word-level timing re-syncs on its own, so the highlight stays in step.
Style
What sits behind the recorded window. The setting is global and updates live in the preview.
- KlipKap backgrounds:
- Eight supplied backgrounds: Ethereal, Obsidian, Axiom, Vanta, Lumen, Novae, Flux and Zenith.
- macOS wallpapers:
- The stock macOS wallpapers from Big Sur through Tahoe, in light and dark variants.
- Upload image…:
- Any picture from your own machine.
- Colour presets:
- Dark and White, plus 16 gradients: Blue, Purple, Green, Rose, Orange, Teal, Amber, Indigo, Crimson, Slate, Sunset, Ocean, Aurora, Fire, Candy and Forest.
- Custom colour:
- Any solid colour, from the picker.
- Reset background:
- Back to the default.
Tune
Camera behaviour, window appearance and colour, in three groups.
Playback: how the camera moves.
- Mouse smoothness (0–1):
- How fluidly the camera follows the cursor path. Higher is smoother and lags further behind.
- Zoom speed:
- Slow, Normal or Fast. How quickly the camera pushes in and pulls back.
- Follow speed:
- How fast the camera pans to keep up with the pointer.
- Auto-zoom:
- Generate builds zoom segments from the clicks recorded in the take; Clear All removes them. The segment count is shown underneath.
Window appearance:
| Setting | Range | Effect |
|---|---|---|
| Background padding | 0 – 240 px | Gap between the recorded window and the edge of the canvas. |
| Video inner padding | −120 – 120 px | Margin between the video content and the window frame. |
| Shadow | 0 – 1 | Drop shadow behind the window. |
| Rounded corners | 0 – 48 px | Corner radius of the window. |
Colour grading and effects:
| Setting | Range | Effect |
|---|---|---|
| Brightness | 0.5 – 1.5 | Lightens or darkens the video. |
| Contrast | 0.5 – 1.5 | Raises or flattens contrast. |
| Saturation | 0 – 2.0 | Boosts or drains colour. |
| Motion blur | 0 – 1 | Blur during camera zoom and pan, applied at export. |
| Film grain | 0 – 1 | Grain overlay, visible in the preview and the export. |
Reset appearance returns every control on this tab to its default.
A little motion blur and a little grain go a long way. Both are on 0 by default; small values make a zoom read as a camera move rather than a jump cut.
Cursor
The cursor is redrawn rather than captured, which is why all of this is still adjustable after the recording exists.
- Style:
- Twelve pointers: Arrow, White, Peak, Doritos, Cloud, Diams, Bubble, Map, Forest, Tree, Melon and Stone.
- Cursor size (16–128 px):
- How large the pointer is drawn, independent of your system setting.
- Cursor shadow (0–1):
- Drop shadow under the pointer, which is what keeps it legible over a light interface.
- Cursor tilt:
- Leans the pointer into its direction of travel and eases it upright when it stops.
- Hide cursor if not moving:
- Fades the pointer out once it has been still, and back in when it moves.
- Hide cursor:
- Removes the pointer from the preview and the export entirely.
Webcam
Present only when a webcam was captured with the recording.
- Enable / Disable:
- Turns the overlay on or off.
- Position:
- A 3×3 grid with eight positions: the corners and the edge midpoints.
- Size (5–40%):
- Overlay diameter as a percentage of the video height.
- Zoom (1.0–3.0×):
- Digital zoom into the camera feed itself, to crop a cluttered room out of frame.
- Mirror horizontal:
- Flips the feed left to right, in the preview and the export.
- Auto-zoom scale:
- How far the overlay shrinks while the camera is zoomed in, so it stays out of the way of the thing you are pointing at.
- Shape:
- Circle and square shortcuts, plus a border-radius slider from 0 (square) to 100 (full circle).
- Shadow (0–1):
- Drop shadow behind the overlay.
- Border width and colour:
- The ring around the feed.
SubsPro
Subtitles are generated from your audio, on your own machine. No audio is uploaded, there is no API key and there is nothing metered per minute. Transcription is a Pro feature; the styling controls below apply once phrases exist.
- Transcribe (Pro):
- Runs locally with a progress bar. Phrases land on the Transcription track when it finishes.
- Show subtitles:
- Renders them, or does not.
- Progressive word highlight:
- Karaoke style. Each word stays lit once spoken instead of dimming back down.
- Inactive opacity (0–1):
- How dim the words you have not reached yet appear.
- Keep short phrases visible:
- Holds the previous phrase on screen at low opacity until the next one starts.
- Font size (12–64 px):
- Text size at 1080p.
- Background opacity (0–1):
- Opacity of the pill behind the text.
- Border radius (0–32 px):
- Corner rounding on that pill.
- Bottom offset (1–40%):
- Distance from the bottom edge of the frame.
When a word comes out wrong, select the subtitle item on the timeline and retype it in the Props tab. The word timing re-syncs automatically, so a correction costs one edit rather than a re-transcription.
Mask
Rectangles that heavily blur whatever is behind them: passwords, API keys, customer names, faces, anything that should not survive the export.
- Enable:
- Turns masks on and adds a Mask track to the timeline.
- Add rectangle:
- Drops a new blur rectangle. Drag and resize it in the preview, or type its position and size in the Props tab.
- Masks stay locked to the content underneath them, so a mask holds its target through a zoom and a pan.
- Use the + on the Mask track to add a mask that covers a different stretch of time.
AI
Two tools, both optional.
AI auto-cut finds dead air, stutters and filler words and adds them to the Cut track. It needs word-level timing, so transcribe the audio first.
- Minimum silence length:
- Only silences at least this long are cut.
- Silence sensitivity:
- How far below the recording's usual loudness counts as silence.
- Detect & add cuts:
- Runs the pass. Re-running never stacks duplicates; overlapping cuts are merged. Clear All removes every cut.
MCP Server (Pro) lets an external AI client connect to KlipKap while it is open: Claude Code, Gemini CLI, Codex, Cursor, Windsurf, LM Studio and anything else that speaks the Model Context Protocol. The client can read the timeline, the transcript and the cuts, and edit them: adding or removing cuts, rewriting subtitle text for a translation, and so on. Changes appear live in the timeline. Toggling it on gives you a ready-to-paste setup command for your client.
The MCP server is a local connection to an app you already have open, and it is off until you turn it on. What the connected client then does with your transcript is governed by that client, not by KlipKap.
Export
| Setting | Options |
|---|---|
| Format | MP4, or GIF (Pro). GIF carries no audio and is capped at 24 fps. |
| Renderer | CPU by default, or GPU (Pro), which uses the graphics card. Faster, and the output is identical. |
| Resolution | 720p, or 1080p / 2K / 4K (Pro). |
| Frame rate | 24 or 30 fps, or 60 / 120 fps (Pro). |
| Aspect ratio | Source and YouTube 16:9, or TikTok and Instagram 9:16, X 1:1, LinkedIn 4:3 and Facebook 4:5 (Pro). |
| Quality | Compact or High, or Max (Pro). |
| Export directory | Browse to pick where the file lands. |
| File name | Optional. Auto-generated if left empty. |
An Output box states the final pixel dimensions and the duration before you commit to the render.
06Exporting
The order to do things in, and the settings worth defaulting to.
Step by step
- Set the in / out range on the timeline so the export covers the take and nothing either side of it.
- Open the Export tab.
- Choose format, renderer, resolution, frame rate, aspect ratio and quality.
- Browse to an export directory.
- Optionally type a filename.
- Click Export Video. A progress dialog reports the render.
- Click Reveal in Explorer when it finishes to open the containing folder.
1080p at 30 fps on Max quality is the setting to reach for by default. It is right for YouTube and for almost every embed, and 4K mostly buys you a longer render and a larger file that nobody watches at 4K.
Vertical and social formats
Switch the aspect ratio to 9:16 for TikTok or Reels and the auto-zoom system reframes the content to fit the vertical canvas. The camera is already tracking what matters, so it has something to reframe around rather than centre-cropping blindly.
Keep GIF exports under about ten seconds. The format has no interframe compression worth the name, so file size climbs fast.
The watermark
Free exports carry a KlipKap watermark. Pro exports do not, and there is no step to perform.
07Projects
Auto-save, and every file operation in the File menu.
Auto-save
KlipKap saves the project two seconds after any change. Saving by hand is only necessary when you want the file in a particular place.
File operations
| Action | How |
|---|---|
| Save | File → Save, or Ctrl+S (⌘S on macOS). |
| Save As | File → Save As…, or Ctrl+Shift+S (⌘⇧S). |
| Open | File → Open Project…, then browse for a .klipkap file. |
| Open Recent | File → Open Recent, which lists recent projects with timestamps. |
| Rename | File → Rename Project… |
| Close | File → Close Project, which unloads it and returns to the start screen. |
| Delete | File → Delete Project…, which permanently deletes the project and its recordings after a confirmation. |
| Reveal folder | File → Reveal in Explorer, which opens the project folder in your file manager. |
08Free and Pro
What the free tier does, what the licence unlocks, and what the audio tools actually do.
Side by side
| Free | Pro | |
|---|---|---|
| Max resolution | 720p | 720p · 1080p · 2K · 4K |
| Frame rate | 24 / 30 fps | 24 / 30 / 60 / 120 fps |
| Export quality | Compact · High | Compact · High · Max |
| Aspect ratios | Source · YouTube | All six formats |
| Export format | MP4 | MP4 · GIF |
| Renderer | CPU | CPU · GPU |
| Watermark | Yes | None |
| Auto-transcription | No | Yes |
| AI Denoise | No | Yes |
| MCP Server | No | Yes |
The free tier is permanent, not a trial. Recording, the timeline, auto-zoom, the cursor styling, masks, backgrounds and the appearance controls are all in it. The licence gates the export ceiling and the AI features, not the editor.
Audio cleanup
Found in the Props tab with an audio item selected. Everything here is applied at export rather than written into the recording, so the original audio is always recoverable.
- AI Denoise (Pro):
- Removes background noise with a neural model, in Standard or High Quality mode. Revertible at any point.
- Noise suppression:
- An adaptive FFT denoiser. Drag for more of it.
- Bass boost:
- Low-shelf boost at 150 Hz, for warmth and body.
- Voice clarity:
- Lifts presence and air, which is what makes speech easier to follow on laptop speakers.
- Voice boost:
- Compression, a presence lift and gain together, for a louder and punchier voice.
- Auto-trim silence:
- Detects silent stretches on the track and removes them.
09Keyboard shortcuts
The four that exist. On macOS, ⌘ replaces Ctrl.
All shortcuts
| Shortcut | Action |
|---|---|
| Space | Play / pause |
| Shift + Scroll | Zoom the timeline in and out |
| Ctrl + S | Save project |
| Ctrl + Shift + S | Save project as a new file |
10Working faster
The habits that separate a twenty-minute edit from a two-hour one.
While recording
- Pause instead of Stop. Segments are stitched automatically and the viewer never sees the seam.
- Test the microphone meter before every session, not just the first one. Input devices change without telling you.
- Record at the resolution you intend to export. A 1080p export from a 1920×1080 window is sharp; the same export upscaled from a small window is not.
While editing
- Set the in/out range first so every preview loops over the part you are shipping.
- Generate auto-zoom from your clicks, then delete the two or three segments that landed somewhere uninteresting. Fixing a generated set is faster than building one.
- Transcribe early, then run AI auto-cut. Stripping dead air and filler in one pass and tidying the Cut track by hand beats hunting for pauses.
- Mask anything sensitive the moment you notice it. The blur tracks the content through zooms, so it does not need re-checking later.
- A macOS wallpaper or a gradient with a little corner radius and shadow gets you most of the way to a polished look before you touch anything else.
While exporting
- 1080p / 30 fps / Max is the right default for YouTube and for embeds.
- Use the GPU renderer if you have a Pro licence. The output is identical and the render is faster.
- For Reels or TikTok, switch to 9:16 and let auto-zoom reframe rather than cropping the export afterwards.
Something missing or wrong?
This manual describes version 1.1.1. Features move between releases, and a manual that quietly falls behind the build is worse than no manual. If a control here does not match what you see, tell us at contact@klipkap.pro and we will correct it.